


- Description
- Application
- Specification
- Installation
- Warranty
- Measure
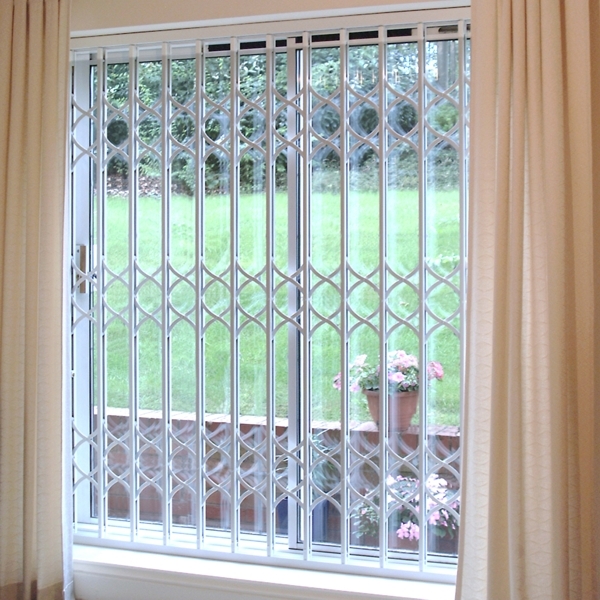
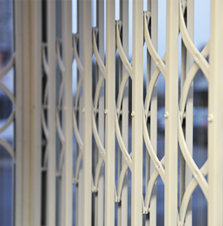
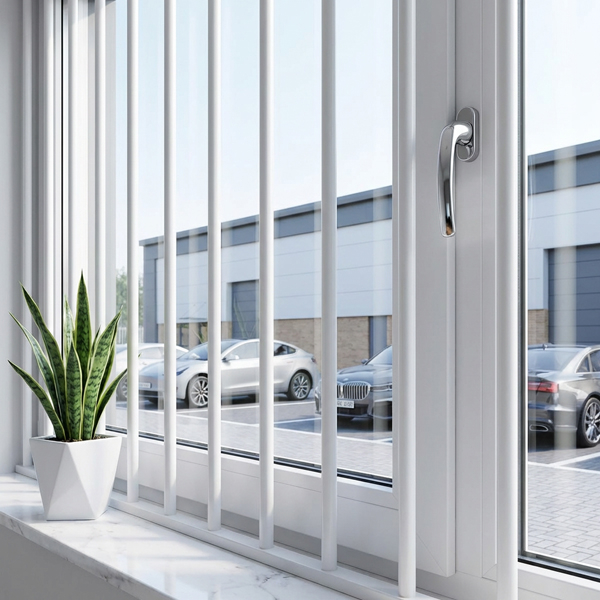
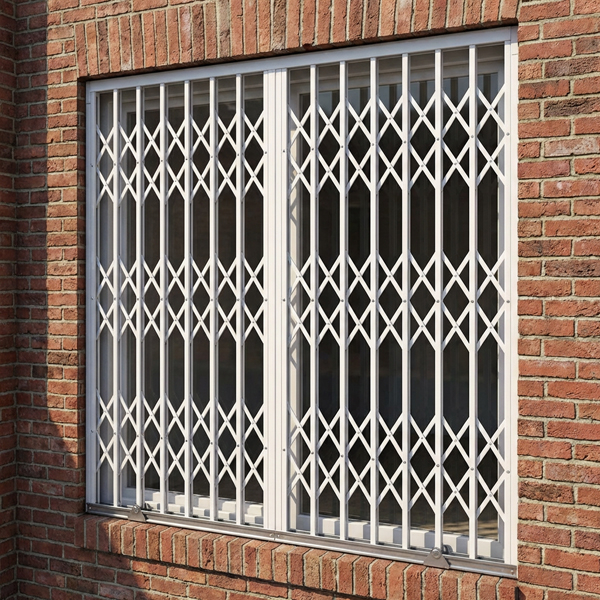
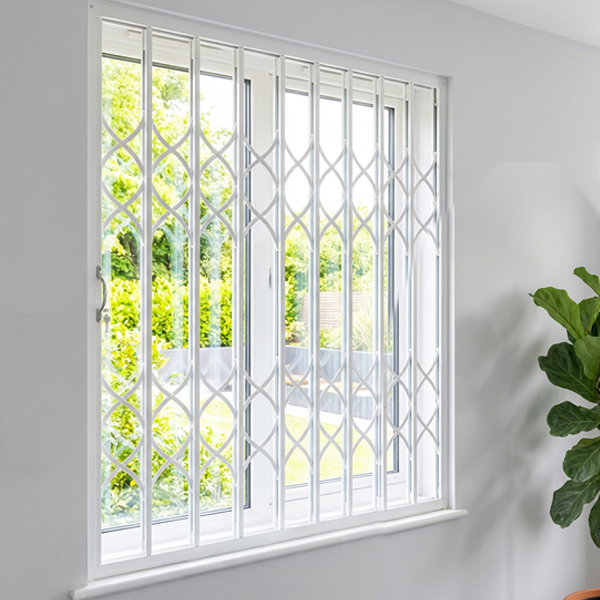
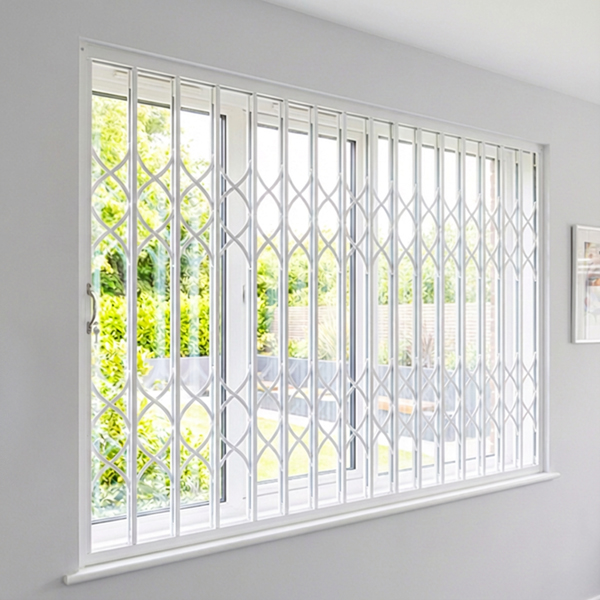
SeceuroBar Removable Security Window Bars
Secure, but removable. Protection in seconds.
SeceuroBar is a simple, made-to-order way to secure vulnerable windows without making your home feel closed in. The bars lock firmly in place from the inside, yet can be released in seconds when you need clear access for everyday living.
Key Benefits
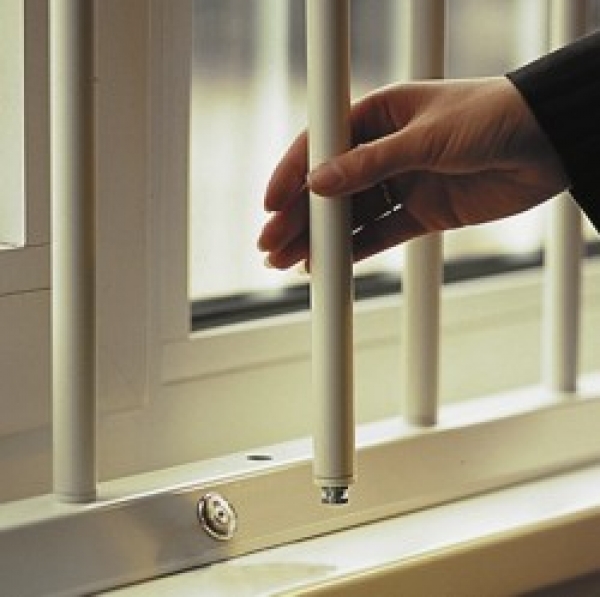
- Secure, but removable: Remove one bar, several, or the full set quickly from the inside when required.
- Anti-cut design: Rotating steel bars help resist hacksaw style attacks.
- Made to measure: Manufactured to suit windows of almost any size, with neat internal fit and finish.
- Flexible layouts: Available in vertical or horizontal bar formats to suit different openings.
- Clean look: Durable powder-coated finish as standard, with colour options available on request.
Security you can remove in seconds
SeceuroBar removable security window bars are a made-to-measure internal system designed to secure vulnerable windows without permanently blocking access or light. Unlike fixed burglar bars, SeceuroBar is designed for everyday practicality. The bars are locked in place from inside the property, but the unique locking mechanism allows authorised users to remove one bar, several bars, or the complete set in seconds.
This makes SeceuroBar ideal for situations where you want visible security without sacrificing the ability to clean, maintain, or fully use the window.
Strong construction with a neat internal finish
SeceuroBar uses tough, powder-coated steel bars secured into strong extruded aluminium retaining units. Bars can be installed vertically for most windows, or horizontally for narrow, tall openings where that layout works better. The system is designed to sit neatly and close to the window frame for a clean, unobtrusive appearance.
Anti-cut rotating bar design
A key benefit of SeceuroBar is the anti-cut design of each bar. The construction allows the bar to rotate, making it far more difficult to cut using a hacksaw or similar hand tools. This added resistance is built into the design without adding complexity to daily use.
High-security locking and easy everyday operation
SeceuroBar is operated using a high-security radial lock. This provides secure locking while keeping operation simple for authorised users. For wider openings, systems can be supplied to suit larger spans, and multiple windows can be keyed alike to reduce the number of keys needed across a property.
Durable finish with colour options
SeceuroBar is supplied in a durable powder-coated white finish as standard, with other RAL colours available on request. This makes it easy to match modern uPVC frames, painted timber windows, or commercial interiors where a specific colour is preferred.
Ideal for homes and commercial security
SeceuroBar is particularly well suited to ground-floor and rear access windows, side windows, basement windows, workshops, stock rooms, and other vulnerable openings. It is one of the simplest and most effective ways to add meaningful window security while keeping your home or premises functional and accessible.
Key features summary
- Manufactured to order for a secure, professional fit
- Removable in seconds from the inside when access is needed
- Tough powder-coated steel bars with a strong aluminium retention system
- Anti-cut rotating bar design to resist hacksaw attacks
- Vertical or horizontal layouts to suit different opening shapes
- Secure radial locking with keyed-alike options available
- White powder coat as standard, with other colours available on request
SeceuroBar removable window bars are designed to protect vulnerable openings while still allowing simple, authorised removal when access is needed. Because each system is made to order and can be installed in vertical or horizontal formats, it suits a wide range of UK domestic and commercial situations where you want stronger security without permanently blocking the opening.
Domestic uses
For homeowners, SeceuroBar is most commonly used on windows that are easy to reach from the outside or hidden from view. It provides a strong visual deterrent and an additional physical barrier, while still allowing bars to be removed from inside when required.
- Ground-floor windows, especially at the rear or side of the property
- Basement and cellar windows
- Garage side windows and outbuilding windows
- Conservatory side windows and other vulnerable glazing
- Rental properties and holiday lets where robust, easy-to-use security is important
Commercial uses
In commercial environments, removable window bars are ideal where you need to secure glazing and access points outside of operating hours, but still want the option of quick internal removal for access, cleaning or maintenance.
- Shop and office side or rear windows
- Workshops, depots and light industrial units
- Storage areas, stock rooms and plant rooms with vulnerable glazing
- Schools, community buildings and managed facilities
- Healthcare, reception and admin areas where controlled access and safety are important
Other apertures (beyond standard windows)
SeceuroBar can also be used on other openings where you want a practical barrier that can be removed quickly by authorised users.
- Serving hatches and counter openings (where a removable barrier is preferred to a fixed grille)
- Narrow, tall openings where a horizontal bar layout suits the shape
- Internal security separation for certain rooms or access points (application dependent)
If you are unsure whether an opening is suitable, Samson Doors can advise on the most appropriate layout and configuration for your property or premises.
Installation Guidance: SeceuroBar Removable Window Bars
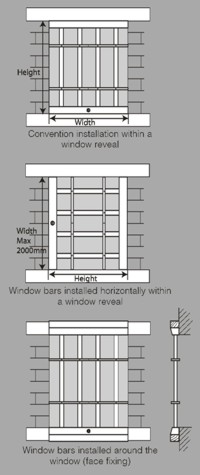
The SeceuroBar system is designed for a precise, close fit within the window reveal. Proper preparation and accurate fixing are essential to ensure the mechanism operates smoothly and provides the expected level of security.
Pre-installation checks
Before starting, confirm that the window reveal is straight and level. If the top and bottom retaining units are not aligned directly above each other, or if the reveal slopes significantly, the sockets may not lock into the slider mechanism correctly.
- Check levels: Use a spirit level to check the top and bottom surfaces. Any deflection in the bottom retaining unit can cause the mechanism to stick.
- Use packers if needed: If the reveal is uneven, packing strips should be used to level the surface before fixing.
- Check dimensions: Verify that the supplied bars match the opening size. Do not attempt to fit if the bars appear too short or too long for the prepared opening.
Step-by-step installation
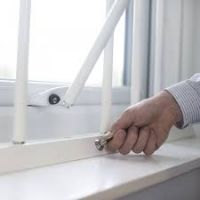
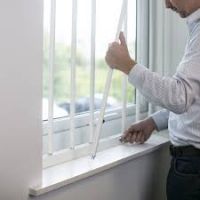
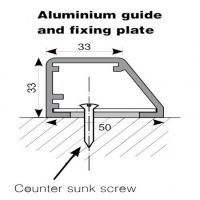
- Position the retaining units: Place the top and bottom aluminium retaining units into the window reveal, positioning them as close to the window frame as possible. This minimizes gaps where dust and dirt can collect.
- Mark fixing points: Mark the fixing positions through the pre-drilled holes in the retaining units with a pencil. Remove the units to create clear space for drilling.
- Drill and plug: Drill appropriate holes for your fixing type.
- Secure the units: Fix the units using countersunk wood screws (minimum recommended size: 10 x 50mm / 2").
Important: You must use countersunk screws to ensure the screw heads sit flush. This provides the necessary clearance for the locking mechanism to operate inside the top retaining unit. - Create lock clearance: It is usually necessary to create a small recess in the reveal directly below the lock position. This allows the bottom fitment of the locking bar to seat fully and correctly.
- Secure fixing plates (optional): For wider openings or horizontal applications, you can secure the internal fixing plates within the retaining unit using masking tape or a small amount of silicone sealant during installation to prevent movement.
- Fit end caps: Before finally tightening the fixings, slide the white plastic end caps outwards to meet the edge of the opening for a neat finish.
Installation limits and dimensions
Please refer to the limitations below when planning your installation. If your opening falls outside these dimensions, please contact us for advice.
Vertical bar installation (Standard)
- Minimum reveal width: 250mm
- Maximum reveal width: 3000mm (single unit)
- Minimum reveal height: 200mm
- Maximum reveal height: 2100mm
- Height note: Any installation over 1500mm high requires spreader bars to reduce deflection.
Horizontal bar installation
- Minimum reveal width: 200mm
- Maximum reveal width: 2000mm
- Minimum reveal height: 250mm
- Maximum reveal height: 2000mm
- Lock position: When fitted horizontally, the lock must always be positioned on the left-hand side (viewed from inside).
Spreader bars (for taller openings)
For vertical installations over 1500mm high, spreader bars are required to maintain rigidity and make it easier to remove the bars.
- Spreader bars must be fitted before the main bars are located into the retaining units.
- Position them approximately one-quarter of the way down from the top and one-quarter up from the bottom for maximum rigidity.
- Secure each spreader bar using the provided M5 x 8mm grub screw and a 2.5mm Allen key.
Face fixing (alternative method)
If the reveal is obstructed, hollow, or unsuitable for direct fixing, the system can be face-fixed to the internal wall surface. This requires 50mm x 50mm aluminium packers (available at additional cost), which should be powder coated to match the system.
Note: SeceuroBar is designed for internal use only. Under no circumstances should it be installed externally.
Installation Guidance: SeceuroBar Removable Window Bars
The SeceuroBar system is designed for a precise, close fit within the window reveal. Proper preparation and accurate fixing are essential to ensure the mechanism operates smoothly and provides the expected level of security.
Pre-installation checks
Before starting, confirm that the window reveal is straight and level. If the top and bottom retaining units are not aligned directly above each other, or if the reveal slopes significantly, the sockets may not lock into the slider mechanism correctly.
- Check levels: Use a spirit level to check the top and bottom surfaces. Any deflection in the bottom retaining unit can cause the mechanism to stick.
- Use packers if needed: If the reveal is uneven, packing strips should be used to level the surface before fixing.
- Check dimensions: Verify that the supplied bars match the opening size. Do not attempt to fit if the bars appear too short or too long for the prepared opening.
Step-by-step installation
- Position the retaining units: Place the top and bottom aluminium retaining units into the window reveal, positioning them as close to the window frame as possible. This minimizes gaps where dust and dirt can collect.
- Mark fixing points: Mark the fixing positions through the pre-drilled holes in the retaining units with a pencil. Remove the units to create clear space for drilling.
- Drill and plug: Drill appropriate holes for your fixing type.
- Secure the units: Fix the units using countersunk wood screws (minimum recommended size: 10 x 50mm / 2").
Important: You must use countersunk screws to ensure the screw heads sit flush. This provides the necessary clearance for the locking mechanism to operate inside the top retaining unit. - Create lock clearance: It is usually necessary to create a small recess in the reveal directly below the lock position. This allows the bottom fitment of the locking bar to seat fully and correctly.
- Secure fixing plates (optional): For wider openings or horizontal applications, you can secure the internal fixing plates within the retaining unit using masking tape or a small amount of silicone sealant during installation to prevent movement.
- Fit end caps: Before finally tightening the fixings, slide the white plastic end caps outwards to meet the edge of the opening for a neat finish.
Installation limits and dimensions
Please refer to the limitations below when planning your installation. If your opening falls outside these dimensions, please contact us for advice.
Vertical bar installation (Standard)
- Minimum reveal width: 250mm
- Maximum reveal width: 3000mm (single unit)
- Minimum reveal height: 200mm
- Maximum reveal height: 2100mm
- Height note: Any installation over 1500mm high requires spreader bars to reduce deflection.
Horizontal bar installation
- Minimum reveal width: 200mm
- Maximum reveal width: 2000mm
- Minimum reveal height: 250mm
- Maximum reveal height: 2000mm
- Lock position: When fitted horizontally, the lock must always be positioned on the left-hand side (viewed from inside).
Spreader bars (for taller openings)
For vertical installations over 1500mm high, spreader bars are required to maintain rigidity and make it easier to remove the bars.
- Spreader bars must be fitted before the main bars are located into the retaining units.
- Position them approximately one-quarter of the way down from the top and one-quarter up from the bottom for maximum rigidity.
- Secure each spreader bar using the provided M5 x 8mm grub screw and a 2.5mm Allen key.
Face fixing (alternative method)
If the reveal is obstructed, hollow, or unsuitable for direct fixing, the system can be face-fixed to the internal wall surface. This requires 50mm x 50mm aluminium packers (available at additional cost), which should be powder coated to match the system.
Note: SeceuroBar is designed for internal use only. Under no circumstances should it be installed externally.
The SeceuroBar/SeceuroShield removable window bar system is manufactured to high standards and is designed to provide years of reliable operation when installed and maintained correctly.
Standard Manufacturer's Warranty
SeceuroBar products are typically supplied with a standard manufacturer's warranty of 2 years covering:
- Manufacturing defects: Faults in materials or workmanship present at the point of supply.
- Mechanical operation: Failure of the locking mechanism or moving parts under normal use.
- Finish: Issues with the powder coating adhesion (subject to correct maintenance and excluding environmental damage).
Conditions and Exclusions
The warranty is subject to standard terms and conditions, which typically include:
- The product must be installed in accordance with the manufacturer's instructions.
- The product is for internal use only; external installation voids the warranty.
- Routine cleaning and maintenance must be carried out (e.g., keeping tracks free of dirt).
- Damage caused by misuse, forced entry attempts, or accidental damage is not covered.
Please refer to your specific quotation or order confirmation for the full duration and terms of the warranty applicable to your purchase, or contact Samson Doors for further details.
Measuring Guide: SeceuroBar Removable Window Bars
SeceuroBar window bars are made to order, so accurate measurements are essential. The system is designed for internal installation within the window reveal. Please follow these steps carefully to ensure a correct fit and optimal security.
How to measure
Measure the width and height of the window aperture (reveal) where you intend to fit the bars. You should take measurements at multiple points to check if the opening is square.
- Measure the Width: Take at least three measurements (top, middle, bottom) inside the reveal. Use the smallest measurement as your width.
- Measure the Height: Take at least three measurements (left, middle, right) inside the reveal. Use the smallest measurement as your height.
- Deduct Tolerance: Deduct a small tolerance (typically 5-10mm) from your smallest width and height measurements. This provides your final Ordering Dimensions and ensures the unit will fit comfortably within the opening.
Important ordering note: Always provide the Width dimension first, followed by the Height (Width x Height). Please double-check your figures, especially the height, as tight reveal sizes must be accurate. If the height provided is too large, the unit may not fit; if too small, the bars may be cut too short, compromising security.
When are spreader bars needed?
If your required height exceeds 1500mm, the system will automatically require two rows of spreader bars. These are horizontal bracing bars used to reduce deflection on taller installations and make it easier to remove and replace the vertical bars.
Important considerations
- Internal only: SeceuroBar is strictly an internal product. It should never be installed on the exterior of a building.
- Check the reveal: Ensure the reveal is solid and level. If the opening is out of square or the surfaces are uneven, you may need to use packers during installation to ensure the top and bottom retaining units are aligned perfectly parallel.
- Face fixing: If your reveal is not suitable for fixing (e.g., hollow cavity or steel), measure the opening width and height as normal, but note that you will need to order the optional face-fixing packers to mount the system onto the internal wall surface surrounding the opening.